| Availability: | |
|---|---|
UTM-10ED
EBP INSTRUMENTS
Shanghai
90 sets / month
TT in advance
1 set
Specification:
Model | UTM-10ED | UTM-20ED | UTM-30ED | UTM-50ED |
Load frame | ||||
Max. Load(kN) | 10 | 20 | 30 | 50 |
Tensile space(mm) | 800 (can be customized) | 700 (can be customized) | ||
Compression space(mm) | 800 (can be customized) | 700 (can be customized) | ||
Test width(mm) | 400 (can be customized) | 500 (can be customized) | ||
Travel distance(mm) | 1140 | |||
Working temperature | +10 ... +35 °C | |||
Conformity | ISO 9000 and CE | |||
Force transducer | ||||
Load accuracy | Class 1 | |||
Load range | 2%~100%F·S | |||
Load resolution | 1/500000 | |||
Displacement transducer | ||||
Resolution of deformation | 0.04um | |||
Accuracy of displacement | Within±0.5%of indicating load | |||
Resolution of displacement | 0.01mm | |||
Drive system | ||||
Motor | AC servo-motor | |||
Test speed(mm/min) | 0.001-1000 | 0.001-500 | ||
Speed accuracy | within ±0.1% of set speed | |||
Power supply | AC220V±10%, 50Hz/60Hz(can be customized) | |||
Standards
ASTMA370,ASTME4,ASTME8,ASTME9,
ISO6892,ISO7438,ISO7500-1,EN10002-4,
GB/T228-2002, GB 16491-2008, HGT 3844-2008 QBT 11130-1991, GB13-22-1991, HGT 3849-2008,GB6349-1986, GB/T 1040.2-2006, ASTM C165, EN826, EN1606, EN1607, EN12430 etc
Main frame
1. High and low temperature tests can be carried out using thermal chambers, ovens, cooling systems, etc. a along with its special testing fixtures.
2. Machine base hosts the lower crosshead, the servomotor as well as the screw-ball driven mechanical transmission system.
3. Two guiding columns (chrome coating) and two high precision ball-screw drivers, assures an optimum load share and optimal linear mobile crosshead displacement.
4. Upper crosshead designed for frame stabilization and stifness. On demand it can be designed to allow a secondary testing frame over the mobile crosshead.
5.  End of stroke detectors (adjustable) and visual positioning ruler placed along the frame.
Parts identification
1. Fixed upper crosshead: to provide test frame
2. Stiffness
3. Mobile crosshead: actioned by the screw drivers. Applies the load against the test specimen.
4. Aluminium alloy housing: to host and protect screw drivers
5. Gripping heads. Other gripping heads and testing fixtures are available
6. Load cell. Universal type (tensile-compression)
7. High precision transducer for measure of the
8. crosshead position. mounted on the ball-screw axis.
Safety Device
1. Stroke protection: Machinery,computer double
2. protection, prevent over preset
3. Force protection: system setting
Emergency stop device: handing emergencies

Standard Accessories | Optional configurations |
Host | |
Wedge Grip V-jaws for round samples, Ф4-Ф9 Flat jaws, 0-7mm | Wedge Grip V-jaws for round samples, Ф9-Ф14 Flat jaws with opening, 7-14mm |
Compression Grip Platen Ф100mm | Other Fixture Bending Fixture |
Ball Screw Precision Ball Screw | |
Panasonic AC Servo motor | |
Test control system | Optional |
Sensor High precision load sensor | US Celtron spoke load sensor |
LCD controller | Touch screen display |

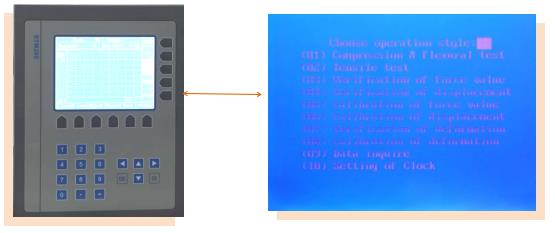
LCD Controller Function Features
1. Automatic calibration: system can automatically realize the accuracy of the calibration value.
2. After the sample broken, automatic stop.
3. Automatic display: Real-time display testing force, displacement, testing speed, peak value, testing status on one LCD.
4. Automatic return: beam automatic return to initial position when testing finished.
5. Breakage judgment: sample after fracture,beam automatic stop moving
6. Limiting protection: Program control and Mechanical limiting protection.
7. Overload protection: When more than 3 ~ 5% of the rated load device automatically stop working.
8. Automatic calculation: automatic calculation area after input sample diameter (round); Width, thickness (flat), sample gauge ect.

Specification:
Model | UTM-10ED | UTM-20ED | UTM-30ED | UTM-50ED |
Load frame | ||||
Max. Load(kN) | 10 | 20 | 30 | 50 |
Tensile space(mm) | 800 (can be customized) | 700 (can be customized) | ||
Compression space(mm) | 800 (can be customized) | 700 (can be customized) | ||
Test width(mm) | 400 (can be customized) | 500 (can be customized) | ||
Travel distance(mm) | 1140 | |||
Working temperature | +10 ... +35 °C | |||
Conformity | ISO 9000 and CE | |||
Force transducer | ||||
Load accuracy | Class 1 | |||
Load range | 2%~100%F·S | |||
Load resolution | 1/500000 | |||
Displacement transducer | ||||
Resolution of deformation | 0.04um | |||
Accuracy of displacement | Within±0.5%of indicating load | |||
Resolution of displacement | 0.01mm | |||
Drive system | ||||
Motor | AC servo-motor | |||
Test speed(mm/min) | 0.001-1000 | 0.001-500 | ||
Speed accuracy | within ±0.1% of set speed | |||
Power supply | AC220V±10%, 50Hz/60Hz(can be customized) | |||
Standards
ASTMA370,ASTME4,ASTME8,ASTME9,
ISO6892,ISO7438,ISO7500-1,EN10002-4,
GB/T228-2002, GB 16491-2008, HGT 3844-2008 QBT 11130-1991, GB13-22-1991, HGT 3849-2008,GB6349-1986, GB/T 1040.2-2006, ASTM C165, EN826, EN1606, EN1607, EN12430 etc
Main frame
1. High and low temperature tests can be carried out using thermal chambers, ovens, cooling systems, etc. a along with its special testing fixtures.
2. Machine base hosts the lower crosshead, the servomotor as well as the screw-ball driven mechanical transmission system.
3. Two guiding columns (chrome coating) and two high precision ball-screw drivers, assures an optimum load share and optimal linear mobile crosshead displacement.
4. Upper crosshead designed for frame stabilization and stifness. On demand it can be designed to allow a secondary testing frame over the mobile crosshead.
5.  End of stroke detectors (adjustable) and visual positioning ruler placed along the frame.
Parts identification
1. Fixed upper crosshead: to provide test frame
2. Stiffness
3. Mobile crosshead: actioned by the screw drivers. Applies the load against the test specimen.
4. Aluminium alloy housing: to host and protect screw drivers
5. Gripping heads. Other gripping heads and testing fixtures are available
6. Load cell. Universal type (tensile-compression)
7. High precision transducer for measure of the
8. crosshead position. mounted on the ball-screw axis.
Safety Device
1. Stroke protection: Machinery,computer double
2. protection, prevent over preset
3. Force protection: system setting
Emergency stop device: handing emergencies

Standard Accessories | Optional configurations |
Host | |
Wedge Grip V-jaws for round samples, Ф4-Ф9 Flat jaws, 0-7mm | Wedge Grip V-jaws for round samples, Ф9-Ф14 Flat jaws with opening, 7-14mm |
Compression Grip Platen Ф100mm | Other Fixture Bending Fixture |
Ball Screw Precision Ball Screw | |
Panasonic AC Servo motor | |
Test control system | Optional |
Sensor High precision load sensor | US Celtron spoke load sensor |
LCD controller | Touch screen display |

LCD Controller Function Features
1. Automatic calibration: system can automatically realize the accuracy of the calibration value.
2. After the sample broken, automatic stop.
3. Automatic display: Real-time display testing force, displacement, testing speed, peak value, testing status on one LCD.
4. Automatic return: beam automatic return to initial position when testing finished.
5. Breakage judgment: sample after fracture,beam automatic stop moving
6. Limiting protection: Program control and Mechanical limiting protection.
7. Overload protection: When more than 3 ~ 5% of the rated load device automatically stop working.
8. Automatic calculation: automatic calculation area after input sample diameter (round); Width, thickness (flat), sample gauge ect.
